Notice: Function register_sidebar was called incorrectly. No id was set in the arguments array for the "Sidebar 1" sidebar. Defaulting to "sidebar-1". Manually set the id to "sidebar-1" to silence this notice and keep existing sidebar content. Please see Debugging in WordPress for more information. (This message was added in version 4.2.0.) in /var/web/site/public_html/wp-includes/functions.php on line 6121 Golden Tee Fan zCOURSES Archives - Page 29 of 108 - Golden Tee Fan

Archives for the ‘zCOURSES’ Category

Agave Ranch — Hole #18: Par 4/5

By Deprecated: Function the_author_posts_link was called with an argument that is deprecated since version 2.1.0 with no alternative available. in /var/web/site/public_html/wp-includes/functions.php on line 6121 • Category: Agave Ranch • • Leave a Comment (1)

Sometimes this hole can set up pretty darn tough, but often it’s not too bad for an 18th hole.  You’ll size up the wind and pin placement and then see if you’re able to drive out to the second fairway, from where you’ll be shooting downhill into this down-sloped green.  A 3-hybrid is often a good club from there to minimize loft and control the wind.  But loft be damned, check out this 8-wood cut right into the hole!

You don’t always want or need to be up there, though, because there’s something to be said for shooting into a straight down-10 green instead of like a left 8, down 7 green from the upper-left fairway.  So at the end of the first fairway, it’s usually a 3-wood with backspin that will carry the wall in front of the green and stick for an eagle putt.

Here’s a 4-wood that dunks in the hole for the ultra shot!

It can be hard to get close to the pin here, which leaves you with a very challenging putt to finish off your round!

There’s a new tee box in the front left that makes this a drivable par 4 instead — check out this ace!

Another new box is front-right from about 320 yards where it’s also a par 4.


Beals Creek — Golden Tee 2019

By • Category: Beals Creek • • Leave a Comment (0)

Here are some early screenshots of the course!  Here is the official preview of the new 2019 Big Spring, Texas course.

At the crossroads of Interstate 20 and U.S. Highway 87, deep in the heart of Big Spring, Texas, is a golf course you grew up with. Jean shorts won’t be welcome at Beals Creek Golf Club, but this neighborhood course, with oil money all around and massive Texas mansions off in the distance, is where deals are made and business gets done. This lush, green track is loaded with sand, and the rolling streams and creeks that tend to be where your ball wants to explore. This is golf, Texas-ified, in its purest form.

Here is a 6-hole preview and discussion from the Golden Tee lounge!

GT Par is most commonly -29 or -30 here, depending on if #1 is drivable.

This post contains tips, tricks, and information related to the 2019 Golden Tee course Beals Creek! Check out the hole-by-hole breakdowns and example hole-outs as I partner up with the Golden Tee community to give you the edge you need to beat your friends!

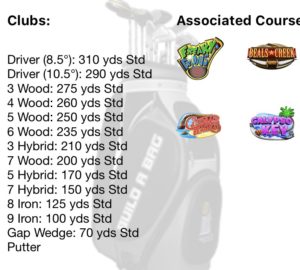
The GTF club set of choice is below, with the preferred ball being Streaks for advanced players and Grabbers or Razors for casual players…it’s worth noting that many advanced players use Grabbers/Razors here specifically because of hole #18, which can be very hard to eagle with the limited backspin of Streaks:

Check out this podcast (itunes) (anchor) which breaks down each hole on Beals Creek offering advice to improve your game, but also know that I have listened and accounted for this advice in my hole write-ups already!


Beals Creek — Hole #1: Par 4

By • Category: Beals Creek • • Leave a Comment (0)

From the front box, this hole is usually drivable – here’s a high-teed driver straight at it for the ace.  And here’s a big C3 that gets it done too!

From the middle box, it can still be worth it to attempt a big drive to get up in the sand for a chip at eagle.

One new tee box is back-left where it’s usually not drivable.


Beals Creek — Hole #2: Par 4

By • Category: Beals Creek • • Leave a Comment (0)

Not much to this one – no reason not to just lay back in the first fairway and bring in your approach.  You could drive to the second fairway but the extra distance doesn’t offer you much here.  Over time, you might just find a spot that leaves you with your favorite club on the approach.

One new box is back-left not altering anything with your approach off the tee.


Beals Creek — Hole #3: Par 3

By • Category: Beals Creek • • Leave a Comment (0)

Unlike most early-round par 3s, you can’t take this one for granted…carry is important to get up onto the green because of the short wall in front.  So, you can’t be too aggressive may times, and bite is often good to settle in for your birdie putt.

This 6-wood just clears from the back box to ace a front pin.

From the middle-right box, this 2-iron finds the hole.

There’s a new tee box up to the right from only about 90 yards — here’s an ace from there.

Another new box is to the right behind the water from about 165 yards.


Beals Creek — Hole #4: Par 5

By • Category: Beals Creek • • Leave a Comment (1)

With most setups, you can blast over the water to the left side of the second fairway for a clear approach.  Even being in the rough here is fine and will leave your club with enough distance to get there.

With really bad setups, you might want to read the pin placement.  Laying up to the left side of the first fairway is fine if the pin is on the left.

If the pin is tucked on the right, you may want to consider laying up to the right side of first fairway for 350-yard A1 second shot instead.

One new tee box is back-right where you may not be able to reach the second fairway.  Options include the rough area in the center of the water, the fairway strip behind the sand to the left of that, and the narrow fairway to the right…it’s going to be a very difficult eagle with this setup!


Beals Creek — Hole #5: Par 4

By • Category: Beals Creek • • Leave a Comment (0)

From the front-half of this box, you can usually take straight aim at the green…look for a little dip in the tree line and play something like a high-teed 5-wood right at it.

From the back half of the box, you’ll play between an A1 and A2 shot around/over the trees into the green, usually with a high tee (3W or 4W most often).  This is a tough shot because you have to be long enough (short is water), but you can’t really stop your ball once it lands on the green.  With front pins, you often hvae a lengthy putt back at the cup, but that’s a successful tee shot!

From the left-center, here’s a high-teed 4-wood curved around for the dunk!

There’s a new box out left making this approach easier, although you still might want to cut into the pin with certain setups…here’s a great 5-wood worked into a right pin.


Beals Creek — Hole #6: Par 3

By • Category: Beals Creek • • Leave a Comment (0)

There are a couple different boxes here, both over water…it’s not the widest green so you’ll still want to take a little time here to ensure you stick it.

From the left box, this 5-hybrid spins back into a front pin.

One new tee box up front behind the water stream offers a 90-yard approach into an up 5 green…here’s an ace from there.


Beals Creek — Hole #7: Par 5

By • Category: Beals Creek • • Leave a Comment (0)

From the back-right box, you should always be hitting a high-teed 10.5 driver with a full A1 into the second fairway…the combination of distance and elevation takes any trouble from trees or water out of play.

From the other two tee boxes, you’re just blasting your drive out into the second fairway however you like best.  No reason not to have a decent approach shot for eagle here.

Here’s a hole-out from the second fairway.

There’s a new tee box in the center of the original three where you can always hit ahead into the center of the second fairway.

Another new tee box is way up left from only 300+ yards where this par 5 is drivable, usually with a high tee over the top straight at it!  Here’s an ace with the 3-wood.

There’s a longer new box as well where can sometimes drive it with a high 10.5 driver.


Beals Creek — Hole #8: Par 4

By • Category: Beals Creek • • Leave a Comment (0)

You’ll find yourself playing left and right about equally here with many combinations of woods and tees.  A good tip is not to let the wind determine the direction you take as much as the pin placement.  For example, in the screen shot here, you want to play around the right side since the pin is on the left.  This lets you land and spin the ball back towards the cup.  If you play around the right, the wind will push your ball away from the hole…it’s much harder to get it close.

The exception to playing “with the green” may be if your tee box and pin placement are on the same side such that it’s a much straighter shot into the green…players will have an easier time controlling a small hook rather than attempting a big hook.  For example, this 5-wood with backspin eases around the right side to spin back into a right cup.

From the back-left, here’s a great 6-wood around the left side that finds a front pin.

From the front-right, this high-teed 8W cut over and around the corner to find the hole.

There’s a new tee box out left of the cart path that offers a fairly straight shot through the trees at the green from about 280 yards…here’s a 3-wood ace from there.


Beals Creek — Hole #9: Par 3

By • Category: Beals Creek • • Leave a Comment (0)

The only note here is that this hole plays slightly uphill, and the green slopes up, so you might consider a little extra strength with your approach to accommodate.

There’s a new tee box way up right from about 200 yards where you have a shot into a left 5 green instead.


Beals Creek — Hole #10: Par 5

By • Category: Beals Creek • • Leave a Comment (0)

From either of the back-right boxes, there are a couple routes you can take to reach the second fairway.  Some looks let you just blast a high-teed driver straight over the trees.  If you need more distance, you can turn left and play a high A1 drive.  But you should also consider turning right and playing a C3 drive over the cart path and through those bunches of trees too…no big penalty for being short there and you don’t have to worry about carrying water!

From the second fairway, here’s a hole-out with the 5-hybrid.

There’s a new tee box left-center of the originals where you can still pretty easily carry a drive into the second fairway for an open approach.


Beals Creek — Hole #11: Par 4

By • Category: Beals Creek • • Leave a Comment (0)

From the original tee boxes, this one is always drivable but you’ll notice considerable differences in distance.  Shorter looks, or looks with a tailwind, only require a medium-teed driver with backspin.  Longer looks call for a high tee where you blast a driver.

In most all cases, you’ll want to aim for the stretch of rough in between the two sand traps in front of the green.  If you land around here, your ball will bounce up onto the green for your eagle putt.  And especially with longer looks, you don’t want to be pin-hunting and come up short in the sand…make your first goal trying to hit that gap to get up on the green, and then worry about your putt.

With an easier look from the front of the box, this driver with backspin finds a front pin.

With a tailwind, this shot can really carry – check out this medium-teed 10.5 driver that finds a back-left pin.

Some of the new tee boxes make this a layup hole.  There’s a new tee box way in the back from about 430 where this hole is usually not drivable, so you may choose to lay up at the end of the first fairway.


Beals Creek — Hole #12: Par 3

By • Category: Beals Creek • • Leave a Comment (0)

There are two shorter boxes and one or two longer boxes that can play almost 300 yards.  This is a tougher green that definitely brings water into play, more so as you see the pin tucked away in the front or right.  You can attack this pin more with the flag on the left.

From the back box, this 4W with bite finds the hole.

From the front-left box, this 4-iron finds the cup.

There’s a new tee box left-center of the originals from about 220 yards.


Beals Creek — Hole #13: Par 5

By • Category: Beals Creek • • Leave a Comment (0)

You’ll almost always be using a high tee to safely blast into the second fairway for an open approach shot.

However, from the right tee box, there’s an area of rough to the right of the grove of trees that can be an option too depending on wind and pin.

There’s a new tee box front-left that allows you to more easily clear the water into the second fairway for your approach.


Beals Creek — Hole #14: Par 4

By • Category: Beals Creek • • Leave a Comment (0)

Some looks let you go straight at this green…it depends what kind of line you have and how lofted a club you can use.  From the back box, here’s a high-teed 5W over the top to a back pin.  And this high-teed 3W easily clears the right side of the trees to a right pin.

Many times you’ll have to curve it around because the main bunch of trees is too tall in the middle.  That shot is also often with a high tee.  However, here’s a great 3-wood with backspin around the right to a back pin.  The challenge is increased here because the wind really picks up and it’s harder to gauge your curve and distance.  Anywhere on the green for an eagle putt is great!

There’s a new tee box out right offering an open approach at the green from about 270 yards.


Beals Creek — Hole #15: Par 5

By • Category: Beals Creek • • Leave a Comment (1)

As usual, your first option is to blast out into the second fairway, towards the left side over the sand.  This offers you a clean approach.  The rough here isn’t awful either as long as you have a straight shot in, because you’ll still have enough distance.  Here’s an 8W hole-out from there.

There are a couple other options if you don’t think you can clear that sand to the left of the second fairway.  First, the end of the first fairway is perfectly fine.  From here, it’s a nice 10.5 driver straight at the green that will clear any small trees in your way.

Next, you can play out to the right of the sand in the second fairway.  From here, you can bring it in with a wood over a dip in the trees…the rough in front of the green slopes down and helps it bounce onto the green for your putt.  This is nice because it takes the water out of play.  Check out this 5-wood right over the top to a front pin.  Here’s one from a slightly different angle with the 6-wood, easily over the top.

There’s a new tee box way up right that allows you to play the right rough as a lay-up area…here’s an example drive off the tee.  But be careful because there’s an out-of-bounds line close to here too, so try to favor the left side to avoid any unexpected OB penalty!

Keep an eye out for looks that offer 400-420 to the green, because especially with a tailwind, you may be able to carry a high-teed driver straight over the top and drive the green!


Beals Creek — Hole #16: Par 4

By • Category: Beals Creek • • Leave a Comment (0)

Most looks have you floating a high-teed wood over the trees into the green, especially from the back boxes.  With a tailwind, you can even get by with a medium-teed 6W so that you can use backspin.  Here’s one with the medium-5W that made it straight over with backspin to a back pin.

From the back-center, here’s an impressive 5-wood cut over the trees into a left pin.

Closer looks like from the front box might call for you to cut around the left of the trees into this green instead.

There’s a new tee box out left from about 290 offering a different look at the green.  With a right wind, it can be a straight shot…here’s a 5-wood ace from there.  With a left wind, this 3-wood curls around and finds the hole.

Another new box is back right from about 300 yards where the trees can still catch a medium-teed 3-wood, so defer to more loft if possible.


Beals Creek — Hole #17: Par 3

By • Category: Beals Creek • • Leave a Comment (0)

For a 17th hole par 3, this one usually plays pretty easy.  The only issue might be a gap in clubs where you have to use a tee to adjust.  When in doubt, the center of the green is a big landing area!

From the front-center box, here’s the same distance and two very different shots…with a tailwind, this wedge rolls into a center pin.  And with a headwind, here’s an 8-iron that settles nicely into a right pin.

From the back-right box, here’s a 6-iron ace.

One new box is back-left from about 220 yards still over the water into an up 7 green.


Beals Creek — Hole #18: Par 4

By • Category: Beals Creek • • Leave a Comment (0)

Usually I’d say you need to be careful thumbing any shot where you’re clearing a wall with water in front, but because this shot is often a more-lofted 5W or 6W anyway, thumbing is not a bad option, especially with a tailwind.  And tailwinds are what present the most trouble here…just make sure your worst case is being long in the sand for a makeable chip back up the hill…don’t get too cute with that front pin!

Here’s a 5-wood with bite that settles into a back-left pin.  And here’s a 4-wood thumber that spins back into a front-right pin.

There’s a new tee box out left from about 230 yards — here’s a dunk from there!

Another new box is back-left from about 290 yards.


Sandhill Woods — Golden Tee 2019

By • Category: Sandhill Woods • • Leave a Comment (0)

Here are some early screenshots of the course!  Here is the official preview of the new 2019 Pinebluff, North Carolina course.

It’ll require back roads and a map to get there—your GPS will do you no good here—but Sandhill Woods offers golfers something they treasure—spectacular, immaculate tranquility. Although the town of Pinebluff, North Carolina is only 2.4 square miles and home to a thousand or so good natured residents, this is now one of the prestigious homes in Golden Tee. The pine trees are tall, as the town’s name would indicate, and the pine straw will provide an atypical surface you’ll learn to hit from. And the closing hole here might just be the most fascinating, curse-word-inducing design in all of 2019.

Here is a 6-hole preview and discussion from the Golden Tee lounge!

GT Par is most commonly -29 to -31 here, with the dependent setups on #1 and #15.

This post contains tips, tricks, and information related to the 2019 Golden Tee course Sandhill Woods! Check out the hole-by-hole breakdowns and example hole-outs as I partner up with the Golden Tee community to give you the edge you need to beat your friends!

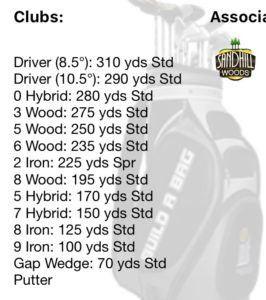
The GTF club set of choice is below, with the preferred ball being Streaks for advanced players and Grabbers or Razors for casual players…it’s worth noting that the 2-iron super spinny club is specific to playing with the Streaks, so if you play another ball, you can substitute that club for a 2-hybrid:

Check out this podcast (itunes) (anchor) which breaks down each hole on Sandhill Woods offering advice to improve your game, but also know that I have listened and accounted for this advice in my hole write-ups already!


Sandhill Woods — Hole #1: Par 4

By • Category: Sandhill Woods • • Leave a Comment (0)

As tough as this course can play sometimes, you’ll appreciate looks where the first hole is drivable — you might only have 370 or so from the front box, allowing you to take a high-teed driver right at the green.  Here’s an ace right at it.  Here’s another one from 400+ at a different angle but again right at it.

Some players can get close from the middle box too, especially if you use Streaks…a C3 can leave you with a short chip and also a chance at eagle.

One new tee box is tucked to the left from 400+ yards making it difficult to reach the green, but possible especially with Streaks and a big C3.

Another new tee box is behind the original three at 500+ yards.


Sandhill Woods — Hole #2: Par 4

By • Category: Sandhill Woods • • Leave a Comment (0)

A 0-hybrid is a fantastic club to have here…from longer looks, you can hit medium tee or low tee and curve it around the trees with something like a B3 with backspin for an eagle putt.  It’s definitely one where you improve with practice but you gain more control by not having the ball in the air as long or having to play as extreme an angle.

From the back-right, here’s a great 0-hybrid curved around for the ace.

And of course there’s enough room around the right side to hit any club (3W or 5W low-teed can work)…here’s a 5W with backspin that finds the hole.

From the front boxes, the same type of shot can be applied with a 2-hybrid.  A 1-hybrid is also great and can be used from either box.

Finally, from the back third of the box, a new option opens up…you can play around the left side with a high-teed 3/4/5W if desired.  Here’s a high 5W floated around the left side that finds a back pin!

The new tee box on #2 is off to the right, taking the trees out of play, and offering a straight shot into the green from about 300 yards for a pretty easy eagle.  Here’s a driver that finds the cup.


Sandhill Woods — Hole #3: Par 5

By • Category: Sandhill Woods • • Leave a Comment (2)

There are many different ways to play this one depending on the tee box.  From the front-right box, it’s often a great play to the sand straight ahead…there’s a large opening between two bunches of trees allowing a clear shot into the green from there.  You can also play across the water into the second fairway, but you might have to curve in your approach from there depending on the wind and your driving distance.

From the front-left box, the sand ahead to the right is a great option again.  Check out this 0-hybrid thumber with release that skips the water and finds the hole!  Playing to the left-edge of the first fairway is also an option for you to work in your approach shot over the water, but it requires two skilled shots in a row to pull off.

From the back-left box, I’m always playing around the left side of the trees with a big A1 drive to place me in the left half of the second fairway with an open approach shot.  Here’s an 8W dunk from there.

The new tee box here is between the front two original boxes and offers a choice among the sand on the right, the fairway in the middle, and the fairway to the left.  The sand is a nice choice with a back pin, and the left fairway is usually a nice choice any time.  The middle fairway can offer trouble trying to weave between the trees at the green.


Sandhill Woods — Hole #4: Par 3

By • Category: Sandhill Woods • • Leave a Comment (0)

From the back box, this high-teed 5-wood thumber dunks for the ultra-shot ace!

From the middle box, this 9-wood also dunks to a back pin.

One new box is off to the left of the front box in the sand area…here’s a 6-iron ace from there.

Another new box is further up left in the sand area from only about 85 yards away.


Sandhill Woods — Hole #5: Par 4

By • Category: Sandhill Woods • • Leave a Comment (1)

This is perhaps the toughest eagle in GT 2019 and one where I’m often satisfied with just birdie.  If the distance is right, a high-teed 6W straight at it can clear the valley of trees and make it all the way over to the green.  It’s possible but a high 5W too but riskier – if you clip the top branches, you’ll fall into the water.

From the front box, this high 6W didn’t quite make it over the trees, but a tailwind helped push it forward onto the green and into the hole!  So keep the wind in mind if you try that high-teed shot over the top…it could make the difference between water and green if you clip the trees.

From the back box, this was a perfect setup and a great shot…high 5W over the ideal gap in the trees to a front pin.

Another traditional option is to click one right and curve around a high 3/4/5W from right to left.  This is also challenging with anything but a left-blowing wind because the trees can still catch your drive on its way into the green and knock it down – it takes a fairly precise angle to land the green this way.  The sand on the right is not a bad miss for an eagle chip!

What I see many players trying (me included) is to take straight aim at the green over the lowest point in the valley of the trees.  Use a high 3W or 10.5 driver and this allows you to clear the first set of trees.  You’ll hit the second set of trees, but there’s a chance you’ll have enough velocity to carry through onto the green.  Unfortunately, there are also a lot of thick branches in those trees that can still knock you backwards or into the water; it’s hard to know where a safe line is.  But if you really want that eagle and want to take a chance, this certainly works out at times.

The new tee box here is in the back, in the center of the three original boxes.  It offers a high 5/6W over the top with some setups and a high 3W hoping to poke through the trees with other setups.  Another option is to rotate right and try to curve something like a 3W into the green.  Finally, you can club up even more to a driver and hope to poke through the trees to the green.  Here’s another from a different angle.


Sandhill Woods — Hole #6: Par 4

By • Category: Sandhill Woods • • Leave a Comment (1)

Here’s another tough hole where the shot you choose will vary widely based on the conditions…you’ll play high/low tees, and maybe even a low 0H skip shot if you have that in your bag.

From the front-right box, you might be able to get a high-teed 9W over the top straight at the green, but that’s not a club that many of us will have in our bag on this course.  A high 8W does not clear the trees.  However, you can cut the corner a bit with a high 8W around the left side and finesse one into the green…here’s a nice ace to a front pin.

Also, check out this driver thumb shot through the trees with the right distance to settle on the green.  Here’s another one with the 3-wood that backspins into the cup!

The center boxes are often a 5/6W where you tee up or down accordingly and work your way past the trees on the left and around the trees on the right into the green.  High-teed 8/9-woods are options here too, especially with a tailwind, to go right over the top!

From the left-center box, here’s a 6-wood thumbed at it with a cross-wind helping push it in the hole.  Check out this low-teed 0-hybrid that skips the water and finds the hole!  And finally, here’s an amazing high-teed 6W that goes over and around the right side of the trees for the dunk!

And from the right-center box, this 6-wood curls around and spins back to a front pin.

It doesn’t appear as if the back-left box is in play yet.

One new tee box here is in the back-right, where you can float a high-teed 5W around the left side into the green, or try to skip a 0H off the water into the green as well.  With a back-pin, this high 3W finds the hole.

Another new tee box here is to the right of the second box, where there are a couple options.  With a good wind, you can carry a high 8W over the trees into the green.  It also looks like you can work a 2I under/through the trees to the green with other looks.  Finally, you can turn left and work a wood over the trees into the green.


Sandhill Woods — Hole #7: Par 5

By • Category: Sandhill Woods • • Leave a Comment (1)

Three or four layup spots here for consideration.  First, if you’re concerned about your accuracy off the tee, there’s no need to stick any fairway island…you can play straight ahead to the end of the first fairway.  From here it’s 300-320 so a hard 3W or moderate 10.5 driver is a nice 2nd shot.

If you prefer to be closer, play out to the longer right island…it’s fairly flat (slopes downhill slightly) so be careful not to carry too far down the center of the landing area.  Same approach shot works from here but it’s slightly closer.  You can also skip the 0-hybrid here up onto the green…check out this hole-out!

The long-left island is the third option but carries the most risk of a miss.  Landing here offers a more lofted wood, which is nice but not really necessary.

Finally, it might be an option off the tee to play a high-teed C3 or A1 driver to carry the water into the rough, but you’ve got to be certain you can make it.

The approach to the green here can be tricky!  It’s uphill so I see a lot of players come up short, especially with a headwind.  A tailwind you can play like normal, but make sure to hit it firm with other winds to carry up and on…short shots bounce back in the water!

One new tee box here is in the front-left, offering a chance to drive out to the second fairway, or at least on the upslope of the hill on the rough, which is a nice approach shot.  Of course, all the original layup shots from before are options too if that makes you more comfortable.

Another new tee box is in the front right, offering basically the same advice as above.


Sandhill Woods — Hole #8: Par 3

By • Category: Sandhill Woods • • Leave a Comment (0)

One new tee box here is way back left behind the sand surrounding the original three tee boxes, from about 250 yards…here’s an ace from there.

Another new box is on the other side of the water from about 100 yards away into a Down 5 green — here’s a 9-iron backspin ace from there.


Sandhill Woods — Hole #9: Par 5

By • Category: Sandhill Woods • • Leave a Comment (1)

Another well-designed hole with many options depending on the setup!  Let’s start with the front-right box…first, there are rare setups where you may be able to drive the green — check out this massive C3 that somehow gets there!  If that’s not your game, there are two good options depending on wind and pin – first is the small middle fairway between the bunches of trees…this is a good option if you can drive far enough for a clear second shot.  Next is the sand to the right over the water – you can plop a drive in here and have plenty of distance to reach the green in two.

From the front-left box, the best option always seems to be playing to the left fairway, where you can drive far enough for a clear second shot into the green.

The back box can be a brutal setup, especially with a wind in your face.  Often the best option here is playing out to the rough/sand on the right again, but it’s two tough shots.  Your drive is key because you need to clear as much water as possible, landing as close to the green as possible, with a high-teed driver.  Assuming you pull that off, you’ll still have a long shot into the green where you need a solid hit, sometimes again with driver, to clear the water into the green.  Here’s a nice approach shot from that area.

The alternative is the narrow fairway to the left, but that approach shot is really intimidating too – you have to curve a perfect A1 over water and try to stick the green, which might not be worth the risk.  Don’t get wet; take your birdie if you need to!

One new tee box here is in front-left of the original front-right box, from only around 370 yards out, making this par 5 drivable especially with a nice wind!

Another new box is in the front-right of the original front box, offering a straighter look at the green but from a bit farther away at 385 yards or so…still drivable with a decent wind!