Notice: Function register_sidebar was called incorrectly. No id was set in the arguments array for the "Sidebar 1" sidebar. Defaulting to "sidebar-1". Manually set the id to "sidebar-1" to silence this notice and keep existing sidebar content. Please see Debugging in WordPress for more information. (This message was added in version 4.2.0.) in /var/web/site/public_html/wp-includes/functions.php on line 6085 Golden Tee Fan Using the track ball Archives - Golden Tee Fan

Archives for the ‘Using the track ball’ Category

Angled straight shots — choose C1 over A3

By Deprecated: Function the_author_posts_link was called with an argument that is deprecated since version 2.1.0 with no alternative available. in /var/web/site/public_html/wp-includes/functions.php on line 6085 • Category: Using the track ball • • Leave a Comment (0)

If you’ve read up on some of my articles discussing the anatomy of the trackball (like this one), then you know that you can sometimes run into issues shooting forwards towards 3.  Hitting a “spinny” C3 certainly helps off the tee, and using thumbs for putting out to 3 can help when on the green.  But what about those straight 180-shots where you want to keep your shot straight to maximize distance, but need to shoot at an angle to do so?

Hopefully you’ve learned by now that if the plane of your backswing doesn’t match the plane of your follow-through, you are losing distance.  When you combine that with the fickle nature of shots out to 3, you can see your distance drop even more.  Not only that, but for right-handers, it’s awkward to push a shot out away from your body, whereas you’re more comfortable shooting across your body instead.

Let’s look at a couple examples where you have some options to put this into practice.  First, consider Jackrabbit #4:
jr_4

Unless you have the back tee with a headwind, you should be trying to carry left to the second fairway.  It’s offset a bit, so you can rotate left twice and play an A3-type shot, or you can rotate just once left and play a C1-type shot instead.  Do the latter — it feels more comfortable and you’ll have more distance.

This also applies to Bear Lodge #5.
bl_5

Again, unless you have the back tee, a good play is to the rough straight ahead to the left of the sand.  With an offset look, you can either angle a straight shot to the left, or to the right.  I always choose to line my shot up so that I am shooting a C1-type shot out to the left, because I’ll get more carry and distance to give me a shorter approach into this green.

Now let’s look at some exceptions, such as Coconut #15:
cb_15

To hit the shortcut patch out to the right, your best shot is to angle a shot left-to-right (an A3-type shot).  Why?  Because there’s water to the left, and a grassy hill to the right that can sometimes help hold that patch.  If you play the C1 shot into this and the wind is doing anything except blowing right, you’ll hop right over and get wet.  So unfortunately, most of the time I’m having to attempt as straight an A3 shot as I can to end up there.

You’d also choose the A3-type shot if the offset is very small this direction and very large if you rotate right to consider a C1 shot.  I just like to favor the C1 shot whenever it’s a toss-up and I need to maximize my distance.  So if you’ve noticed inconsistencies and shorter distances shooting out to 3, see if you can rotate right and play the shot out to 1 instead!


Players vs. IT — how spin and the trackball affect your shots

By • Category: Approach shots with irons, Features, Putting, Using the track ball • • Leave a Comment (1)

There are three parts to this discussion, but they have been up for debate for years.  Let’s start with spin on putts.
PLAYER CLAIM: Applying roll or backspin to putts affects the putt.
IT CLAIM: Spin has no effect on putts.

Many pros believe that spin absolutely has an affect on the putt.  Some players are completely sure that applying roll on a putt helps it out of the fringe.  Others believe applying roll to a putt reduces the chance of a rollover on a steep downhill putt.  Some believe that backspin helps slow a putt and gives you a better chance of reducing rollovers.  And many pros just laugh because they think that spin simply has no effect on the putt.  The stance from IT has been that spin SHOULD NOT have any affect on the putt, because spin has not been programmed into the game to affect the putt differently.  Yet the pros are the ones playing on a daily basis, so their opinions and results are certainly basis for this debate!

Finally, many pros believe that distance balls putt faster and farther than normal balls.  The evidence behind this is pretty easy to see by doing a couple tests.  I haven’t heard IT refute this one.

THE TAKEAWAY: Do what “you believe” helps you.  If you think that you make more putts by applying spin, then by all means, continue doing so.  But know that there is no true evidence to support this behavior, at least from the programming point of view!  Also know that the farther your ball goes off the tee, the farther it will go on the green during a putt, albeit not a very significant amount.
PLAYER CLAIM: Pulling back to A or C on downhill putts helps prevent rollovers.
IT CLAIM: This behavior has some affect, but it’s not programmatical.

It’s widely believed that you need to pull the trackball back to A or C on downhill putts to help prevent the chance of a rollover.  I follow this advice and I believe in it.  However, IT also claims that nothing is programmed into the game to support this theory.  IT did bend on this claim for another reason, though.

Due to the trackball design, it’s possible that a pullback to A, but especially C, slows down the putt due to the design of the trackball.  Angled pullbacks create different reads on the sensors of the trackball, so the evidence supporting this theory may just be physical, due to the design of the trackball and NOT the programming of the game.

In addition, most players hit downhill putts with less force anyway.  When you slow the putt down, it’s got the best chance to go in.

THE TAKEAWAY: Continue pulling back to C on your downhill putts of 5 or more, and try to hit them softer than normal putts.  The combination of the physics of the trackball with the slower velocity should certainly help you minimize your rollovers.
PLAYER CLAIM: Backspin adds elevation to your shot, while roll reduces it.
IT CLAIM: Spin has no effect on the height of your shot.

This one isn’t much of a debate.  While IT says that backspin and roll have not been programmed to alter the height of your shot, there’s overwhelming evidence supporting the contrary.  Specific player tests have proven that backspin gives you a little more elevation on your shot, while roll makes your shot fly a bit lower than with no spin applied.

THE TAKEAWAY: If you are ever in need of a bit of extra elevation, put backspin on your shot.  To reduce the height of your shot, apply roll.  This is, of course, considering distance and the function of the spin itself in addition to elevation.


Spinny or not? Follow these tips!

By • Category: Using the track ball • • Leave a Comment (4)

Thanks to Chisolm Woodson for submitting this great article on the workings of the trackball and how spinning the trackball affects your shot!  So here we go…

The best way to test spinny versus non is on the practice range.  It’s a real eye-opener to hit ball after ball from the same tee and see the other balls that you have hit still there.  I set the range on my machine to 100 balls (vendor setting), but most are at 25, which is fine.  The fact that you have to play stock clubs and stock balls is irrevelant, because the key to seeing what spinny does is in the repitition.

A spinny c-3 makes a HUGE difference.  The key is not the fact that it was pulled back to C — it’s the fact that you are hitting it to 3.  Try this as a test, and you will see what I mean — pull back straight to B, don’t play a spinny, and hit as far to 3 as you can, and as hard as you can.  Do this for ten shots, and you will see all of your balls clumped pretty close together, except for shots where the trackball was extrememly miss-hit.

Now, do the same for ten more, pulling back to B, then hitting a spinny to 3.  It doesn’t matter which way you spin it after the initial pullback is full and the club head is at the top.  For this test, just spinny it straight back, then wham it out to 3.  You will see that these next 10 balls will be close together, but in a different spot than the first 10.

Now try the same test doing a pull back to B, and then shoot 10 shots to 1 without a spinny, and then 10 with.  You will see there is basically NO difference!  That is one of the biggest misconceptions about spinny shots — that a spinny 1 is just as effective as a spinny to 3.  It’s not!

It doesn’t have anything to do with how the program is written; rather, it’s how the 3 bearings are set up on the trackball.  The two active ones are at 12 o’clock and 9 o’clock.  There is one more at 4:30, but it doesn’t have any sensors on it.

When you hit to 1, you are hitting directly between both sensors, both at a 45 degree angle.  When you hit to 3, you are hitting to the top sensor (the one that reads forward/backward) at a 45 degree angle, but you are hitting away from the one at 9 o’clock (the one that reads left/right).  And, with the dummy bearing at 4:30, that is why you can hear and feel the track ball “jump” when you hit it out to 3.   So, the 9 o’clock bearing has a hard time accurately reading the direction when it is hit away from it if the ball is not spinning.  If you don’t hit a clean shot out to 3, the ball may go straight instead of right, and this is why!

Now, if the track ball is spinning, the sensors are already picking up a reading, so it recognizes the instant change of direction before the track ball jumps off of it.  Also, I think that the added rotation helps to keep the ball from jumping as much, but I believe the sensor being active is the key.  I don’t work for Happ (company that makes the trackballs), so I can’t say which of the two are the reasons for sure… but, I do know that the location of the bearings, and especially the two active ones, are the reason that a spinny out to the right changes the outcome.


Is your trackball rolling straight?

By • Category: Miscellaneous, Using the track ball • • Leave a Comment (3)

If you’re like me, you’ve had to put up with playing on a machine where the ball “pulls” to one side or the other.  So, if the ball pulls left, a normal shot straight forward will get pulled left by the flaw in the dirty trackball or rollers.  And then, to compensate, you have to think before EVERY SHOT to hit the ball forward slightly right of where you’d normally aim.

This also goes for pulling back also, as in this example, the ball would pull right on the pullback.  So, your mentality is to pull back slightly left of where you normally would, and shoot forward slightly right of where you normally would.

This is a pain in the ass, but in my area, the trackballs don’t get a lot of attention from the vendors.  I try to avoid these machines, but I’d rather play a round using a slightly messed up trackball than play no round at all!

In extreme cases, it’s easy to tell which way it’s pulling just by rolling back and forward before you begin.  But for less noticeable cases, or when you’re playing a different machine for the first time, use this test!

On the first tee, pull up the Options and go to Equipment Setup.  Go to the Buy Balls screen.  Now, position the cursor in the middle, dead gap between the first and second panes surrounding the golf ball details.  If you’re hovering over one of the three panes, you’ll see it highlighted, but when you move the cursor to the narrow line in between the panes, nothing will be highlighted.

Now, move the cursor to the top of this dead area, and slowly pull the trackball straight back.  If the cursor trails off to the right or the left, you’ll know the trackball has a pull.  Do the same thing from the bottom, rolling the ball straight forward slowly, and you’ll usually see the pull in the opposite direction going forward.

This test can also be used to determine how accurate you are when pulling straight back or pushing straight forward!  So, if you’re having accuracy problems when shaping shots, go here and make sure your shots back to B or forward to 2 are indeed going where you want.

This was another great tip given to me by Juan Schwartz that you should be able to use to test the trackball on any machine you’ll be using — good luck!


Length of curved shots

By • Category: Using the track ball • • Leave a Comment (1)

I got this great tip from one of the pros who helps me out:

“For any shot under 50/50 (50% A or C and 50% 1 or 3) it will cut off distance. Anything over it will add distance.”

So, keep that in mind when you are applying curve to a shot!  If you are adding just a little curve, expect some distance to be cut off.  But, if you are playing close to a C3 or A1, you’ll definitely add distance!


Shoot the outside J

By • Category: Features, Using the track ball • • Leave a Comment (4)

Here’s a tricky shot that can make you look like a genius when you pull it off. We all know the shape of the C2 shot, where it goes out straight and curves left towards the target, and we know the shape of the B3 schwerve, where the ball heads out right but comes back to a target in front of you. We also know an A3 is a straight-line shot out to the right. But what do you do when you have to thread a gap where you need the ball to head out to the right, but straighten out towards the end, so it ends up coming straight-in to a target off to the right? Enter the outside J!

I needed a name for this shot, and when I realized the shape of the shot when going out to the right is like a ‘J’, it was pretty easy. So how do you pull it off?

It’s tricky, and you won’t use it very often, but you should have it in your arsenal. First, figure out how far to the right you need the ball to end up (for this shot, you should need the ball to end up about a half-rotation right of target). So, pull the trackball back just slightly left of B, but no more than halfway between A and B. This tells the game you want it to end up right of target.

Then, shoot the ball forward out to 3! This tells the ball to begin its angle way out to the right. So, when you pull it off, you’ll see the ball take off out to the right, but it will soon straighten out and end up coming in straight ahead to your target (hence the ‘J’ shape)!

Usually, you can get the ball to a right target more easily by rotating right and hitting some form of C2 or B3, but the J shot is for situations where you’re threading trees or find yourself behind some obstacle and have an offset look at the pin or target.

Of course, the same theories apply to the backwards J shot too, where you need to hit it out left instead!

Be careful shooting the outside J with a right-to-left wind, because the ball will have a much harder time coming back against the wind! Also be wary of pulling back too far left of B, or else you might just see the shot behave like an A3 instead.

Here are several situations when you might see the pros shoot this shot:
1) You’re offset so you don’t want it to come back to straight
2) There’s a big break on the green
3) There’s a strong crosswind to the left and you need to “undercut” it so that it will ride the wind back left more than actually cut back toward the hole.
4) You have a shorter shot with a strong crosswind to the right. Here you might turn left once and shoot the outside J so that it fights the wind a little bit. It might make a 12 mph wind act more like a 6 mph wind which helps you have more control of the shot once it hits the green.

It’s not an easy shot to master, but give it a try sometime and see what happens!


Diving deeper into the anatomy of the trackball

By • Category: Features, Using the track ball • • Leave a Comment (4)

As an amateur player, I’ve come across some more questions regarding the trackball and how its behavior affects your ball in certain circumstances. I’ve addressed some of these questions in this article so that all of us can come away with a better understanding of exactly why the crappy shot we just executed was so bad.

Now you know most of what there is to know about A1 and C3 shots, while also getting an inside look at the trackball! But, always wanting more, I had some additional questions in mind that I got answers from by the expert community!

Q: Do the sensors only read the pullback angle up until your golfer is at full backswing?

A: Yes. This means two things.

First, you don’t have to crank the ball backwards, although for most guys, that’s the easiest way to generate a pure pullback angle. If you want, you can pull back gently until your golfer is at full backswing. From that point on, pulling back any more has no effect.

Secondly, you can’t change your pullback angle if your golfer is already at full backswing. Instead, you have to “reset” your golfer by rotating left or right (for example), and then perform the pullback again.

Q: Sometimes, when you pull back part way, you can push forward slowly to decrease the backswing. What effect does this have on your final pullback angle for the shot?

A: This created some controversial discussion. Here are several takes on what happens:

1) A1 spinny with the club coming down: club is pulled back all the way to A, start spinning, the club starts coming down by itself, but with slow downswing speed. Ball doesn’t go very far because of the slow downswing.

5-wood pulled back all the way, then nudged down to halfway, then thumb at normal thumbage speed. Ball goes a lot farther than expected. Why? I think because you pulled all the way back to begin with.

2) It will start the shot from the stopped point. However it will have read the first part of the forward swing. Stopping the club will not reset this. You really shouldn’t push the club forward and stop it because knowing exactly what read it got off the little bit it was pushed is damn near impossible. So it will affect the angle but to know how is dependant on where it was pushed forward.

Q: Is there a “maximum velocity” at which you can hit the ball forward? Meaning, is there a speed at which distance maxes out? Can humans reach this speed?

A: Yes, yes, and yes. There didn’t used to be a known max on the RPMs, so there were some crazy ways to hit the trackball to get just a “little more” distance. They finally put a max (or restrictor) on it to keep people from killing themselves while playing and to level the playing field a bit.

Q: How are distance and angle affected if you pull back “past” A or C or shoot forward “past” 1 or 3? Does this decrease distance because of how the sensors are hit? Are the max angles at exactly A and 1?

A: There are angles past A, C, 1, and 3. The max cut will yield the max distance. Some people refer to the “past A, past 1” (and C3) as an overcut. Spinning the ball while you do that is the Spinner (Spinny). If you don’t use these shots at some point in a game, you’re probably not maximizing your potential score. There are also variations of these shots (an overcut A, but hitting between 1 & 2, for example) to get a different effect.

Sobe has a seemingly contradictory stance on this topic also:

“Don’t Overcompensate:
When you hit the trackball forward outside of 3 (towards ‘choose club’) the shot will actually cut inside as if it was hit closer to 2 1/2. No, the trackball isn’t broken – you just missed your line, my friend.”

Q: Does it matter if you pound down on the ball as opposed to a smooth, straight follow-through? It’s hard for me to shoot forward at 1 or 3 the same way I shoot forward at 2, so I usually pound down on it since I can’t follow through as well. So, I’m wondering how this is affecting my distance.

A: Pounding down on the ball will reduce distance. Here is more explanation:

Pounding down on the ball has a much different effect then a smooth hit. The biggest difference is the RPMs are going to be way off. I guess the best way to describe it is comparing the shot to a change up in baseball. You can swing your arm as hard as you want, but it will not spin the ball as fast.

I am also a firm believer that you have way more control over a smooth shot as compared to the beating that gets put on the balls. A smooth shot is much more consistant. You get into a mode where you know the “feel” of a shot. To achieve this you have to have a consistant motion. That cannot be achieved pounding down on the ball.

It also wears the balls out quicker when they are being hit down on.

However, within Sobe’s article, he has another take on this approach:

“Top players know that hitting down on the trackball is not the proper way to play Golden Tee. Hitting across the ball smoothly is the way to maximize performance. But hitting down on the trackball is the most important element of a successful C-3. It will take practice and a little patience but trust me; it really works. Some shots, especially softer ones, have a tendency to come off the clubface straight even though you hit out towards 3. This is caused by the movement of the trackball within its casing. So, by hitting down on the trackball you’ll help prevent this from occurring. Try it – you’ll notice the results right away.”

Q: How much can accuracy and distance be affected by a “dirty” trackball?

A: Depends on how dirty! Accuracy and distance can be affected by a dirty trackball, but it’s hard to say how much.


Revisiting the “schwerve”

By • Category: Features, Using the track ball • • Leave a Comment (8)

The schwerve (schwervy) refers to a B1 or B3 shot, and it’s important enough that I wanted to bring it back for discussion. I see several players lose strokes because they are scared to play this shot, but I think it’s just because they don’t fully understand it and its potential!

Usually, you use a schwerve as a mini-hook around an obstacle directly in front of you. So, your target is straight ahead, but maybe you have some tree branches you’re scared of clipping. The simple solution is to play a little B1 or B3 to go around the branches and come back in at the target.

More advanced players use the schwerve to optimize their angle of approach into the flag where the slope of the green or the wind might otherwise move the ball away from the pin. Let’s say the flag is on the extreme right side of the green. If there’s a moderate wind blowing left, or if the green slopes left, it’s going to be difficult to stick it close to the pin. More than likely, amateur players are going to end up in the middle of the green (if they play safe), or run the risk of missing right, off the green (if they play aggressively). In these situations, the schwerve allows you to fight the wind or the slope by coming in at the opposite angle. So here, you’d play a B1-type shot to come in at a right-to-left angle, increasing your chances of sticking the ball by the cup.

Of course, wind is always going to be a consideration. You won’t always be pulling back exactly to B. Remember, you pull back to where you want the ball to end up, so that’s the first thing you figure out. Then, you can apply the “schwerve” to optimize your angle of approach!

For free practice hitting a schwerve, just try it while teeing off on an easy, non-drivable par 4. Keep your eye on the point in the middle of the fairway where you expect the ball to end up, and then note where it actually does end up. Also note the degree of curve you just created on the shot and the angle at which the ball came in towards the target. Practice this with all the clubs in your bag, because the angle and distance the ball comes back towards center varies with each club. Here is a list of roughly what you can expect from each of the clubs by hitting a full B1 or B3. For example, the driver will come back about 10 degrees past center, but the 7-iron will come back only about 10 degrees short of center (assuming a flat landing surface with no wind):

Driver — 10 degrees past center
3-wood — 5 degrees past center
5-wood — about center
2-iron/hybrid — 15 degrees past center
3-iron/hybrid — 10 degrees past center
4-iron/hybrid — 5 degrees past center
5-iron/hybrid — about center
6-iron — 5 degrees short of center
7-iron — 10 degrees short of center
8-iron — 15 degrees short of center
9-iron — 20 degrees short of center
SW — 25 degrees short of center
LW — 30 degrees short of center

Notice how the low-lofted clubs come back past center, but the high-lofted clubs don’t come back all the way to center. Keep this in mind when practicing these shots! Also remember how much the wind affects the high-lofted clubs as opposed to the low-lofted ones! Finally, notice that if you pull back to B but hit between 1 and 2, the ball only hooks about half as much, and the wind will take it more here as well.

One final note to remember — when trying to stick a green with a schwerve, remember that the backspin will take it the direction its headed. So, let’s say you schwerve a 5-iron into the green with a B3. With no spin, it would land a little right of center but roll to about center. But, WITH backspin, it will land just right of center, but then the backspin will pull it slightly left of center.

So, hopefully you have a better understanding of the schwerve, and now you can go out and practice it on the course! Feel free to leave comments if you have anything to add!


The 180 rule

By • Category: Features, Using the track ball • • Leave a Comment (5)

Another lesson I understood only just recently is the impact of a straight-angle shot out of the rough vs. a curved shot. I was aware that curved shots lose a lot of distance when applied from the rough (or sand, etc), but I didn’t realize how far these straight 180 degree shots can go! I never really had these shots in my repertoire, but now I use them quite a bit — an A3 or C1-type shot is a great way to maintain distance from the rough while also fighting wind or slope by coming in at an angle! Also beware of how far woods travel in relation to high-lofted irons — I missed quite a few greens long before I realized the impact this kind of shot has. You’ll also notice the distance you lack if you don’t pull back on shots from the rough. Get some practice with these shots to recover from errant tee shots and still hit the green with ease!


Pulling back the trackball

By • Category: Using the track ball • • Leave a Comment (2)

Only just recently did I learn of a big mistake I was making that was surely costing me several hit greens.  I had no idea that the machine reads only your initial pullback of the trackball, and not any adjustments you try to make after it unless you reset your approach. I have always been in the habit of pulling the ball back once, and then pulling it back several more times until I have the angle I want. Little did I know that it only reads the first pullback and what I was doing had no effect at all! That one realization alone should greatly improve my game, or yours for that matter.Going along with that lesson was the habit of overcompensating for trackballs that don’t come straight back. For instance, if a trackball gets dirty, a pullback you think is straight may actually tail off to the left or right at the end. I figured the machine read that last movement before the ball quit spinning and that I had to compensate for that.  But, it really only reads the pullback until your golfer’s swing is fully cocked, ignoring what happens afterward (so you don’t need much of a pullback at all — only until you’ve created a full backswing).  How about that!  This will look like a stupid post to the pros, but if you’re like me, I bet you didn’t know these facts either!


Intro to the trackball

By • Category: Using the track ball • • Leave a Comment (0)

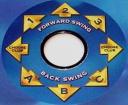
This is where everything begins in Golden Tee. You have to know how to create all the different kinds of shots that Golden Tee allows you to shoot. A picture of the trackball is shown below, and this section gives you tips on how to create all the shots you’ll need:


One-Step Shot types

By • Category: Using the track ball • • Leave a Comment (3)

Golden Tee tips tricks One-Step Shot typesYou don’t have to pull the trackball back before every shot in Golden Tee, nor do you want to! A big tip is that you can get a more accurate shot by just blasting the ball forward to the direction where you want it to go.

1
This shot creates a straight-line shot off to the left. I use this shot to fight against small to medium winds blowing to the right. By shooting the ball in a straight line left of target, the wind will blow the ball back right towards the target.

2
As expected, this shot will go straight forward, but the wind will blow the ball depending on the direction.

3
This shot creates a straight-line shot off to the right. I use this shot to fight against small to medium winds blowing to the left. By shooting the ball in a straight line right of target, the wind will blow the ball back left towards the target.

Palm or Thumbs?
So should you blast away at the trackball with your palm, or should you flick the ball forward with your thumbs? There are situations that call for both.

If you want maximum distance from your wood or iron on any one shot, you’re probably best to hammer the trackball with your palm.

If you’re trying to land the ball at a specific yardage, you can go either way. If you’re more comfortable gauging distance with a palm shot, then stick with that (you can always take some speed off). If you want to give your palm a rest, or if you want to finesse the shot so that it doesn’t go quite as far as you’d like it to, thumbs are a good option also.

If you have a short chip, it’s probably best to get the feel with your thumbs. Palm shots when trying to hit a short wedge can often end up too long.

Putting is up to personal preference, but the majority of good players putt with their thumbs. I used my palm for a long time for putts and did pretty well with it, but I recently switched to thumbs, and I’m starting to see the benefits. Thumbs seem to allow you to putt more accurately than sliding your palm up towards the target, but again, personal preference prevails!


Two-Step Shot types

By • Category: Using the track ball • • Leave a Comment (5)

Golden Tee tips tricks Two-Step Shot typesYou can more distance and create all kinds of angled shots in Golden Tee by using the two-step shot type. Tips on each are outlined below:

A1
This shot creates a giant hook to the right. The ball will start off heading roughly 45 degrees to the left, and it will end up coming in roughly at a 45-degree angle to the right. This shot is great if there is a tree directly in front of you and your desired landing area is off to the right past the tree. The shot would curve right around the tree and come in towards the landing area at an angle.

A2
This shot creates a hook to the right. The ball will start off heading straight forward, but it will hook right at roughly a 45-degree angle. This shot is great if you have a clear path forward but really need to hook it right to the landing area. It’s also great for fighting against heavy winds blowing to the left.

A3
This shot creates a straight-angled shot to the right. The ball will travel in a straight line roughly 45 degrees to the right of where you are facing. I rarely find a need to execute this shot (except maybe for fighting the wind), since you can just rotate to the right and hit it straight forward.

B1
This shot is good for shooting around an obstacle in front of you to a target in front of the obstacle. The ball will start off heading at an angle to the left, but it will come back around and end up roughly straight ahead of you, coming into the landing area at only a small angle.

B2
Straight back, straight forward! This shot is great for long, straight drives.

B3
This shot is good for shooting around an obstacle in front of you to a target in front of the obstacle. The ball will start off heading at an angle to the right, but it will come back around and end up roughly straight ahead of you, coming into the landing area at only a small angle.

C1
This shot creates a straight-angled shot to the left. The ball will travel in a straight line roughly 45 degrees to the left of where you are facing. I rarely find a need to execute this shot (except maybe for fighting the wind), since you can just rotate to the left and hit it straight forward.

C2
This shot creates a hook to the left. The ball will start off heading straight forward, but it will hook left at roughly a 45-degree angle. This shot is great if you have a clear path forward but really need to hook it left to the landing area. It’s also great for fighting against heavy winds blowing to the right.

C3
This shot creates a giant hook to the left. The ball will start off heading roughly 45 degrees to the right, and it will end up coming in roughly at a 45-degree angle to the left. This shot is great if there is a tree directly in front of you and your desired landing area is off to the left past the tree. The shot would curve left around the tree and come in towards the landing area at an angle.


Rule to remember

By • Category: Using the track ball • • Leave a Comment (3)

Golden Tee tips tricks Rule to remember trackballFirst, you’ll always have the shot types and how to execute them right in front of you on the control panel on Golden Tee, so you don’t have to memorize how to shoot all these shots. Experience will also play a major role in your comfort level with the execution of these shots.

Secondly, I came across a great tip that goes a long way towards trackball advice. Basically, you want to pull the ball back towards where you want the ball to end up, and you want to shoot forward towards where you want the ball to start. So for an A1 shot, as you are pulling back towards A, visualize the ball ending up in a straight line out from A to 3 (which would be roughly 45 degrees to the right). And as you shoot forward towards 1, the ball will start off in that direction (roughly 45 degrees to the left).

Play around with the angles as you get more experience with these shots. For instance, if you need a small hook to the left and want to start the ball off just a little to the right, pull the ball back between B and C and shoot it forward between 2 and 3. It’s all about learning just how much hook will do the job for the shot you need!